How to read this guide
Do A first pass once. After that, use the headings as a reference. Turn Tips on and hover anything you are unsure about. The window answers in one line.
People also ask
What does Paraflex Lens do?
It plays the same audio at three time scales, each with its own pitch, shelves, and tempo-locked repeats, blended against the dry signal.
Is Lens a time-stretch plugin?
It listens over short, medium, and long windows and can hold a cloud with Freeze. Pitch runs ±24 semitones on each layer. Repeats lock to the host tempo.
Will Lens add latency while I track?
Not in Live timing, which is the default. The dry hit stays immediate and the layers bloom in after they have heard enough. Turn Live off only when you want every path lined up.
What are Micro, Meso, and Macro?
Micro is the short scale and repeats in eighths. Meso is the middle scale and repeats in quarters. Macro is the long scale and repeats in halves.
What Lens is for
Put it on a track, a bus, or a send when you want the sound to bloom, shift, or echo without leaving the tempo.
- Harmonic width. The opening pitches are an octave down, the original octave, and an octave up.
- Tempo-locked repeats. Each lens echoes in its own note-value family.
- Tone, per layer. A low shelf and a high shelf on each lens, plus a tape control across all three.
- A held cloud. Freeze keeps a recent moment ringing in every lens at that lens’s pitch.
- Live playing and mixing. Live timing lets the dry signal stay immediate. Aligned timing lines every path up when you are printing or when the layers must speak together.
Lens is not a mixer and it is not a tuner you put on every channel by habit. It is a colour. Use it where the part can spare the space it adds.
What you need
| macOS | macOS 12 or later, Apple silicon or Intel |
| Windows | 64-bit Windows 10 or later |
| Sound | A stereo or mono source from the host |
| Formats | This release: VST3 on Windows and macOS. Audio Unit and AAX are not in this release. |
The footer shows the version and the format you opened. This release opens as VST3. Audio Unit and AAX are not in the installer yet.
Lens is an effect. Load it on an audio track, an instrument track’s effect slot, or a bus. It does not make sound by itself. It needs the host to be playing, or an input that is already sounding.
Close the host before you install or update.
Install
macOS
- Double-click the installer package.
- If macOS says it cannot check the installer, close that warning, open System Settings → Privacy & Security, choose Open Anyway, and enter your password.
- Finish the installer. It asks for an administrator password because the plugins are installed for every user.
What it places:
- VST3:
/Library/Audio/Plug-Ins/VST3/Paraflex Audio/Paraflex Lens.vst3 - Audio Unit:
/Library/Audio/Plug-Ins/Components/Paraflex Lens.component - AAX, when the installer includes it:
/Library/Application Support/Avid/Audio/Plug-Ins/
If a host says the plugin is damaged, quit the host and clear the quarantine, then open the host again:
xattr -dr com.apple.quarantine "/Library/Audio/Plug-Ins/VST3/Paraflex Audio"
xattr -dr com.apple.quarantine "/Library/Audio/Plug-Ins/Components"
Windows
Run the setup and accept the license.
- VST3:
C:\Program Files\Common Files\VST3\Paraflex Lens.vst3 - AAX, when included:
C:\Program Files\Common Files\Avid\Audio\Plug-Ins\
If the window later opens as a plain panel of controls, run the setup again and restart the host.
After installing
Rescan plugins. Logic Pro: Settings → Plug-in Manager → Reset & Rescan Audio Units. Other hosts have their own rescan. Ableton Live, Reaper, Cubase, Bitwig, and Studio One load the VST3. Pro Tools loads the AAX only, and only when that component was installed.
If Lens appears twice, a second copy is probably in your user plugin folder (~/Library/Audio/Plug-Ins on macOS). Keep the system copy and remove the extra, then rescan.
Lens in a host plugin list, on an audio-effect slot rather than an instrument slot.
License
Click Activate on the right of the top rail.
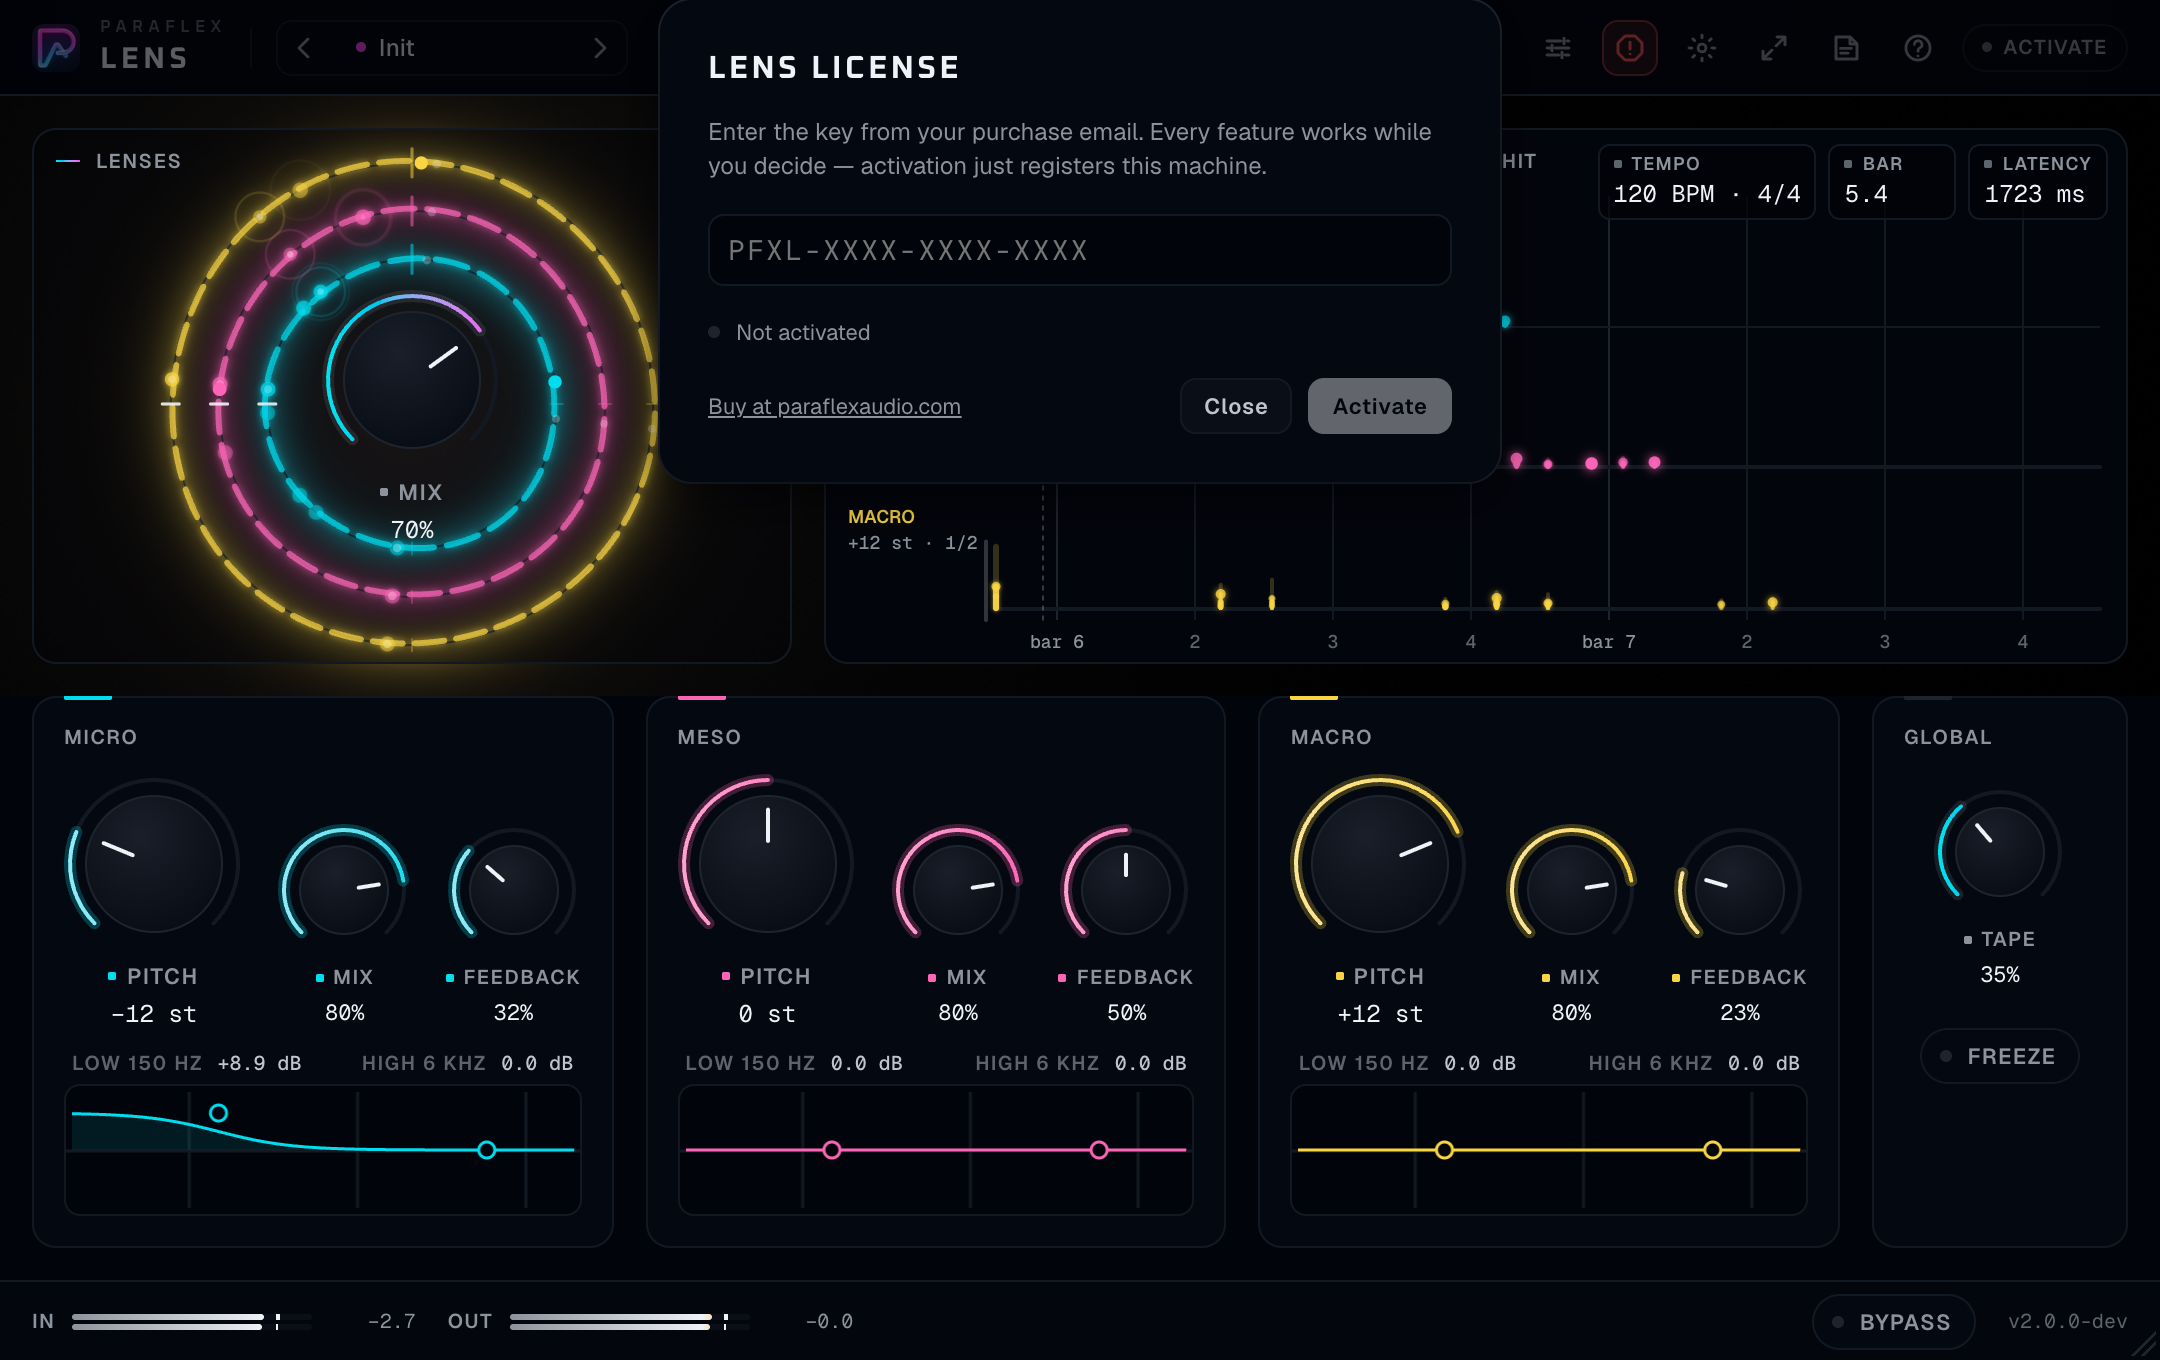
PFXL-XXXX-XXXX-XXXX.- The key looks like
PFXL-XXXX-XXXX-XXXX. - Until this computer is activated, Lens stays silent, including when Bypass is on. Activation registers this computer and the sound comes back at the same reported latency.
- One key, one computer at a time. Deactivate on the old machine before you activate the new one.
- After a successful activation the plugin keeps working away from the internet until the date in that activation, and then for seven more days. The sheet tells you how many days remain. When that period ends, Lens is silent until you connect and open it.
- Buy at paraflexaudio.com is on the sheet. The purchase, tax, and refund are handled there. Questions about the plugin go to support@paraflexaudio.com.
The rail chip reads Licensed when this machine is activated.
A first pass
- Put Lens on a drum loop, a vocal, or a sustained chord. Press play.
- Leave the three pitches where they start: Micro an octave down, Meso in unison, Macro an octave up.
- The centre knob is Mix. It starts mostly wet. Pull it back until you can hear the dry hit and the bloom as two things.
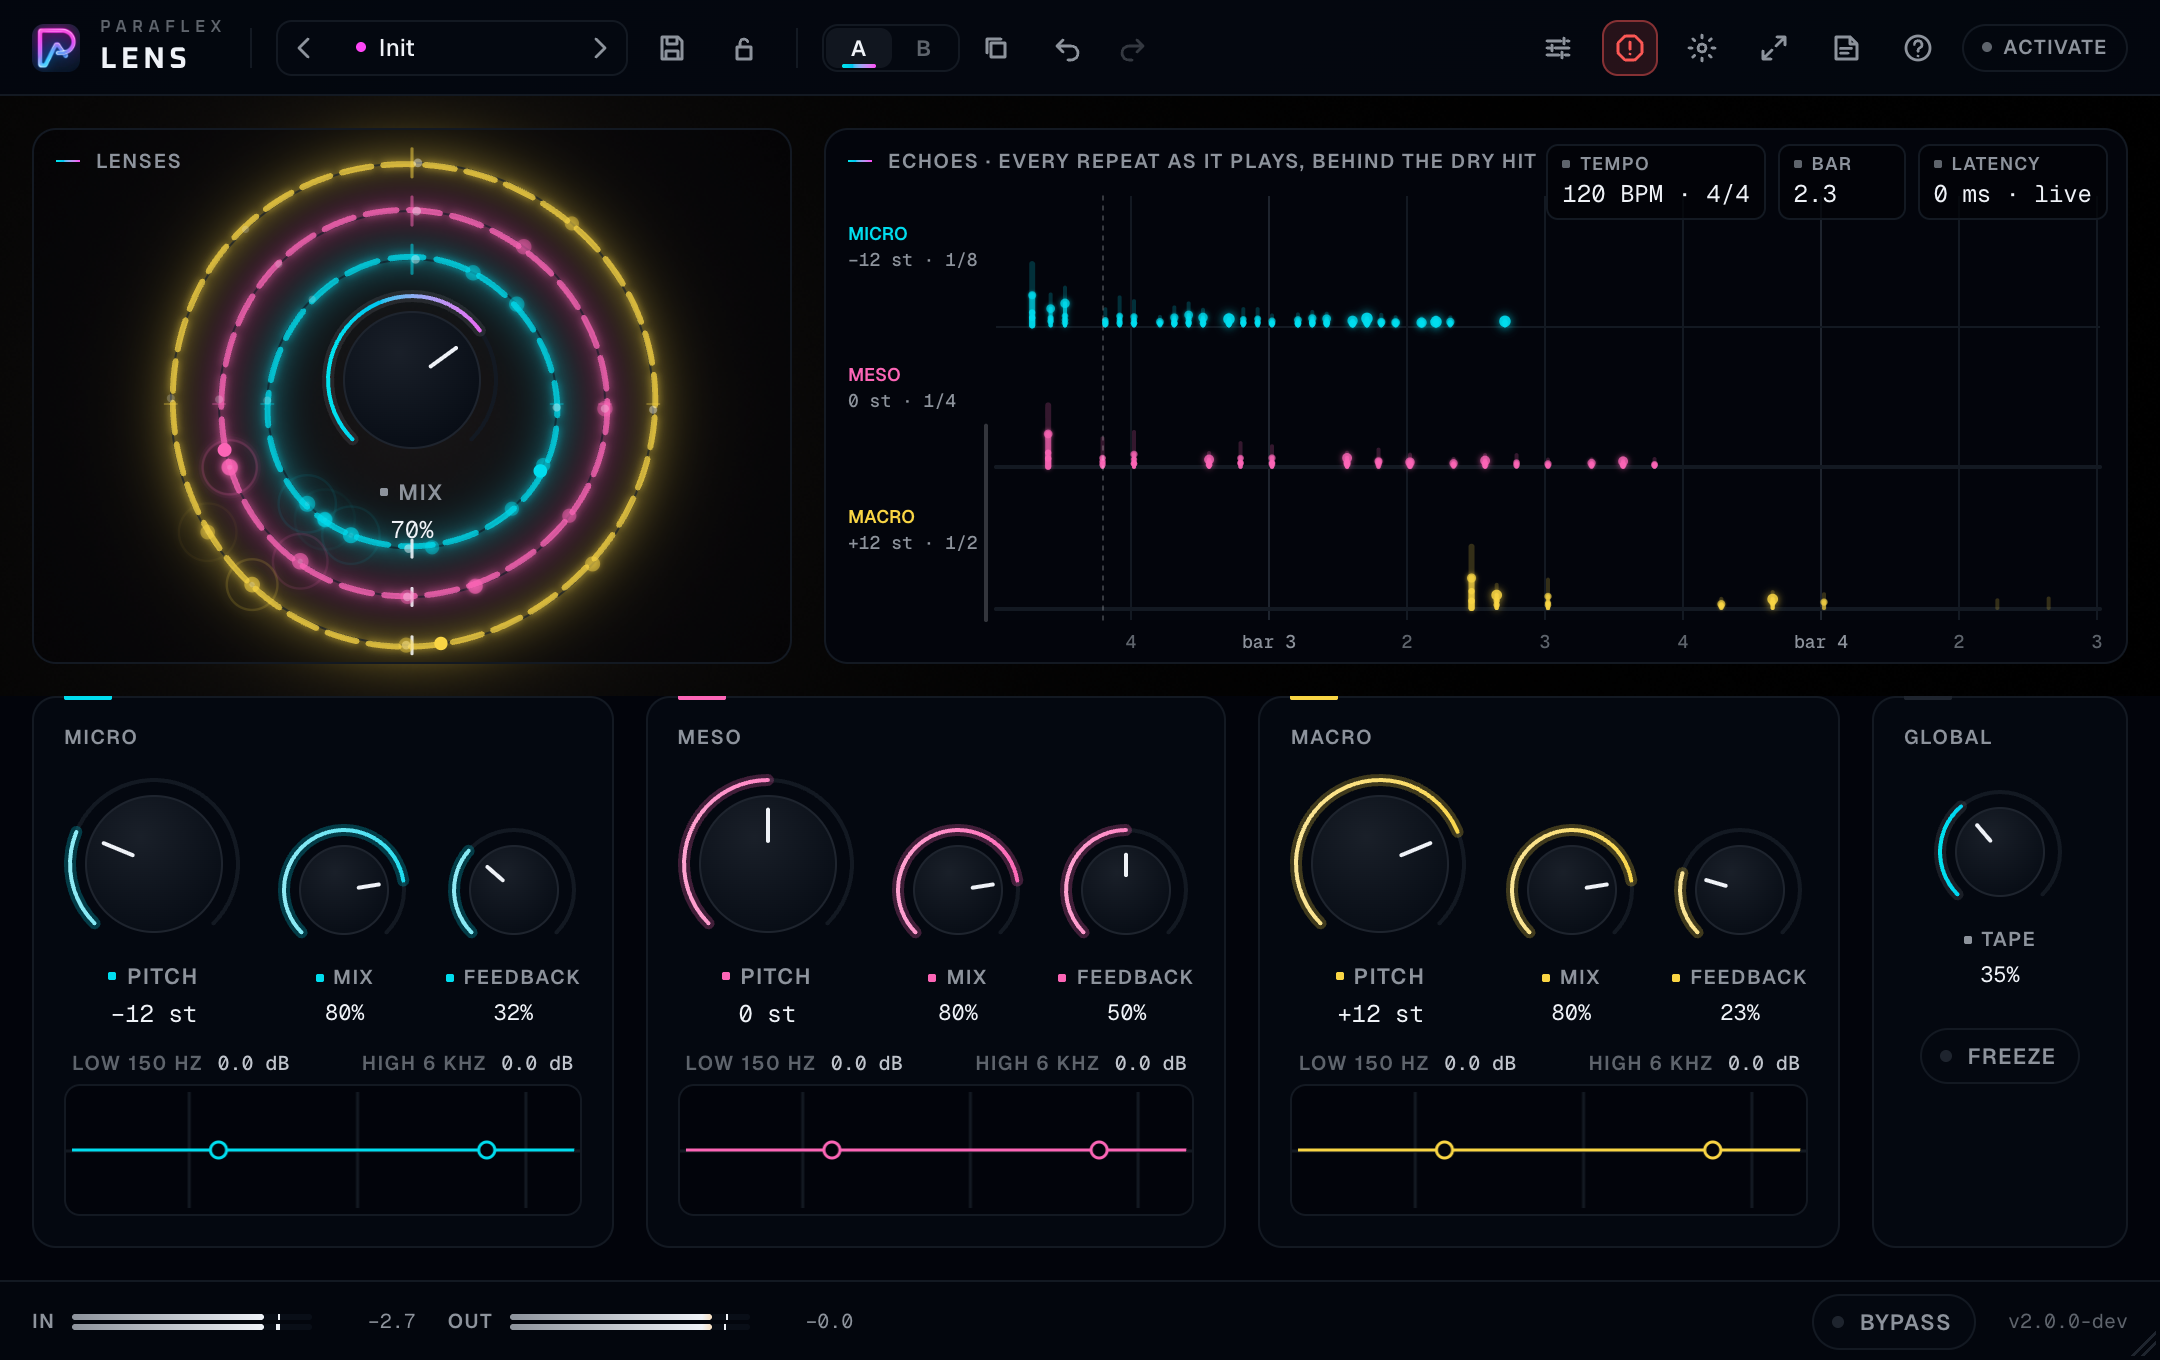
- Look at the echo display. You should see marks behind the hit, on the bar grid.
- Raise Feedback on Meso a little. The quarter-note repeats should land on the grid.
- Click Bypass and listen. Click it again. The dry hit should not jump in time.
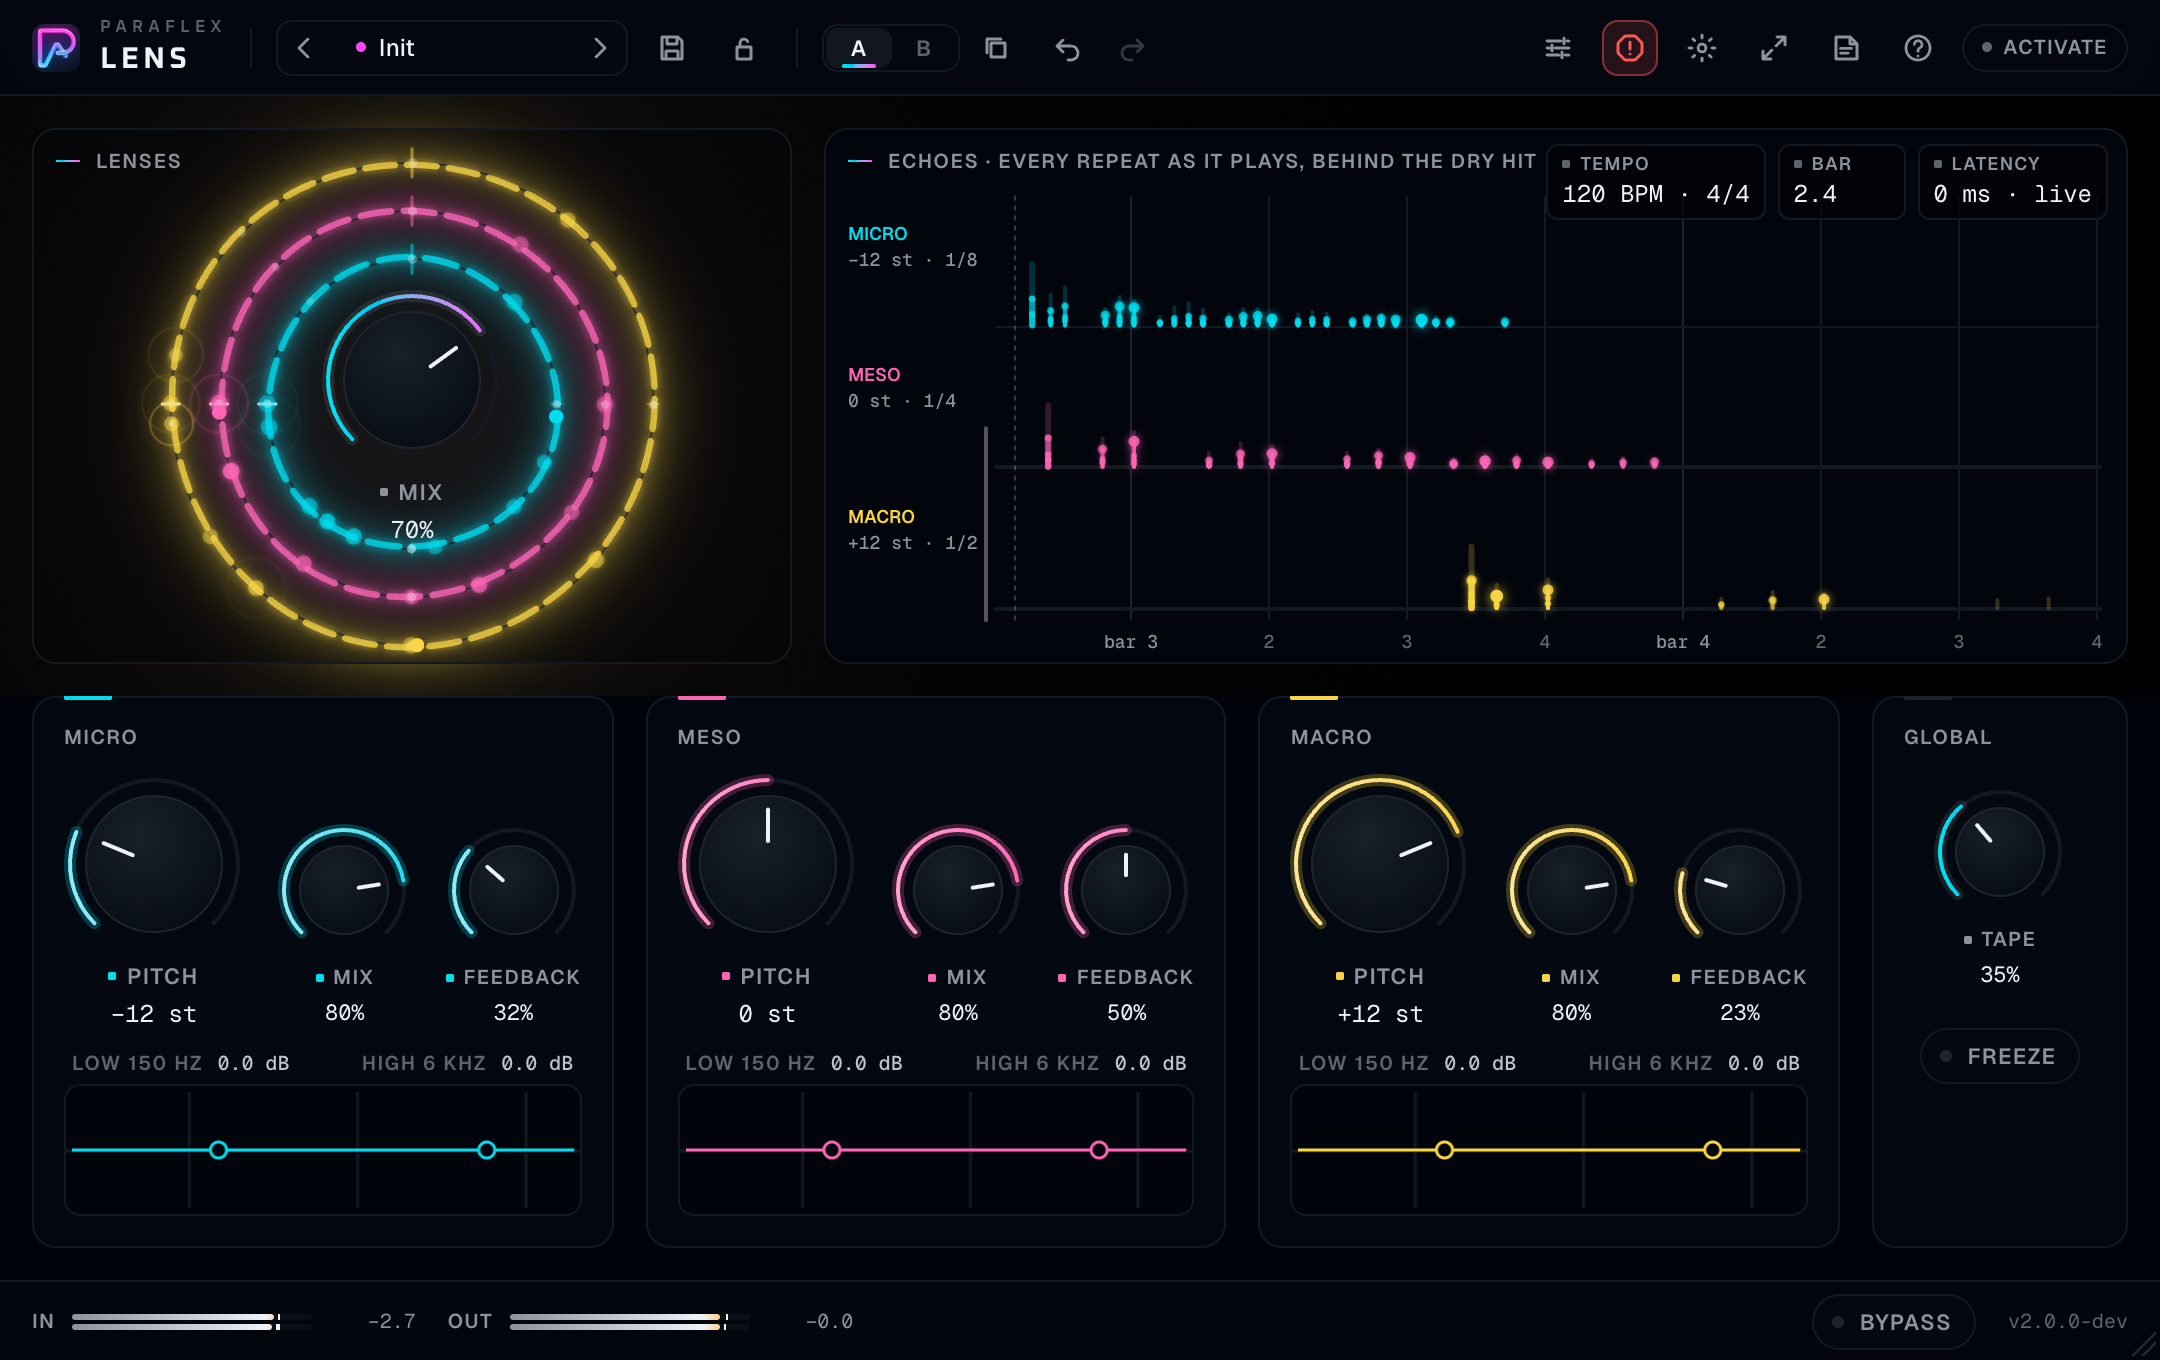
If you hear only the dry signal, Mix is down or all three lens Mix knobs are down. If you hear only a wash, the centre Mix is high and Feedback is high. Pull both back.
The three lenses
Lens always runs three layers. They are the product.
| Lens | What it listens to | Repeats lock to | Opening pitch |
|---|---|---|---|
| Micro | The short scale: grains, attacks, the edge of a syllable or a hit | The eighth-note family | −12 st |
| Meso | A middle window: the body of a note, a short phrase | The quarter-note family | 0 st |
| Macro | A long window: sustain, tails, the shape of a bar | The half-note family | +12 st |
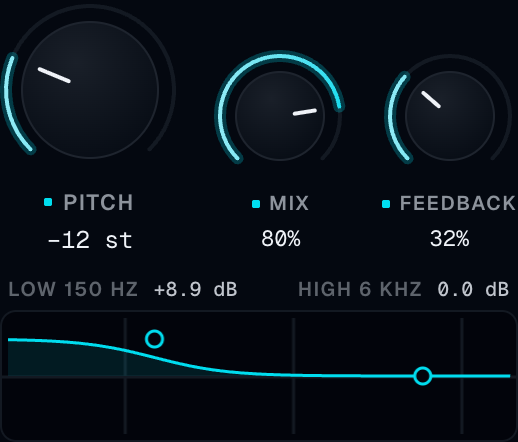
Pitch on each lens runs from −24 to +24 semitones, in semitone steps. The centre of the knob is unison. Micro starts an octave down and Macro an octave up so the first thing you hear is already a stack. Meso starts in unison so one layer can stay honest to the source.
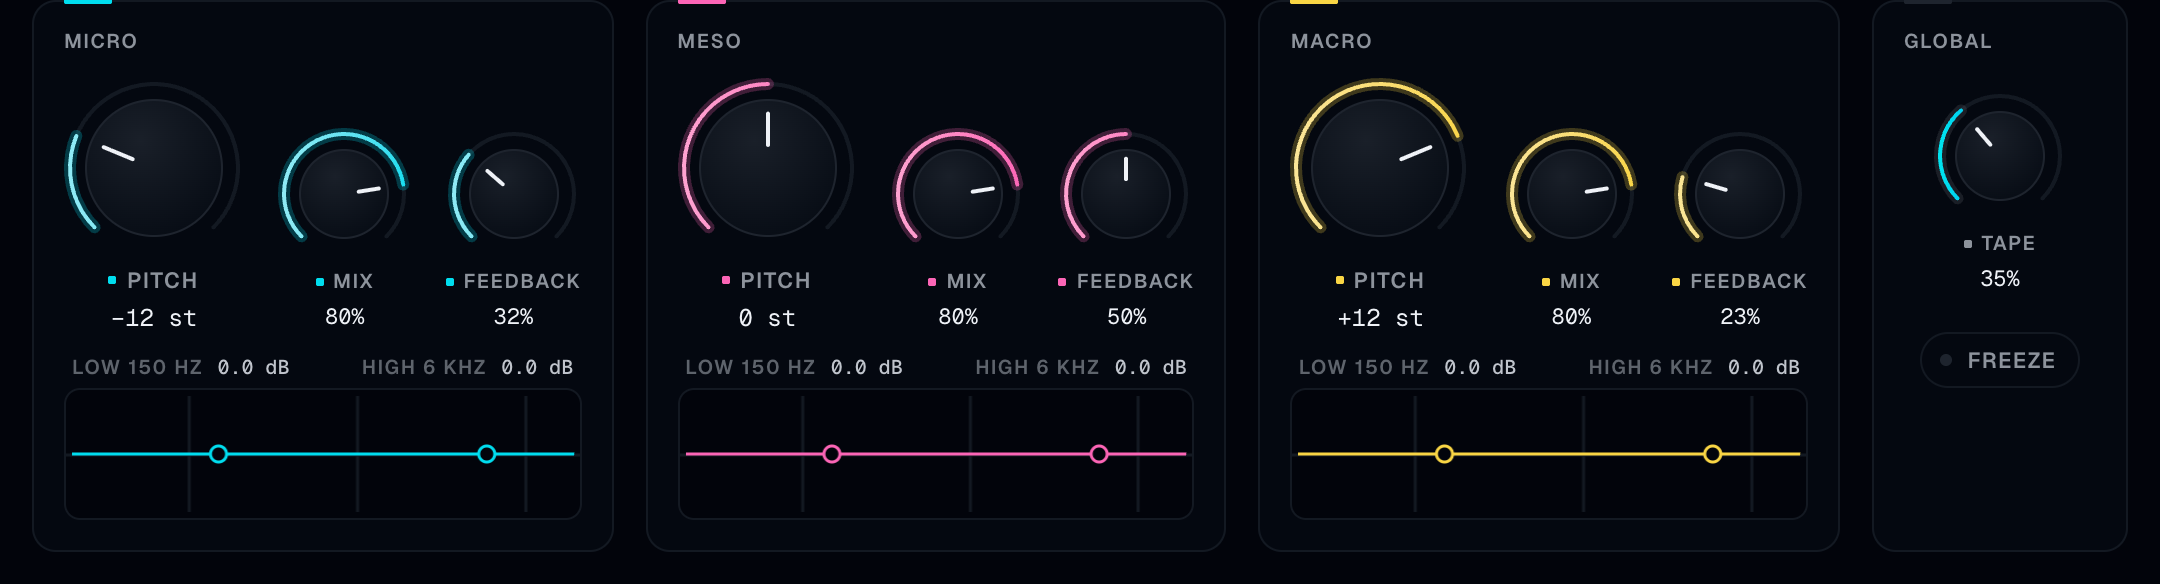
Each group has:
| Control | What it does | Starts at |
|---|---|---|
| Pitch | That layer’s pitch, in semitones | −12 / 0 / +12 |
| Mix | How loud that layer is | Fairly hot, about four-fifths |
| Feedback | How many tempo-locked repeats of that layer | Off |
| Low | Shelf at 150 Hz, from −12 dB to +12 dB | Flat |
| High | Shelf at 6 kHz, from −12 dB to +12 dB | Flat |
The shelf curve is the control. Drag the low side or the high side, or use the caption under the curve. Flat is the centre. A boosted high shelf on Macro alone is a common way to put air on the bloom and leave the dry vocal untouched, because these shelves are on the layer, not on the dry path.
Feedback at zero is one statement of the layer: the pitched sound, delayed by whatever that lens needs in order to hear, and no echoes after it. As you turn Feedback up, repeats appear. Micro’s repeats live in the eighth-note family, Meso’s in quarters, Macro’s in halves. They follow the host tempo. Change the song tempo and the repeats move with it.
The displays
Lenses
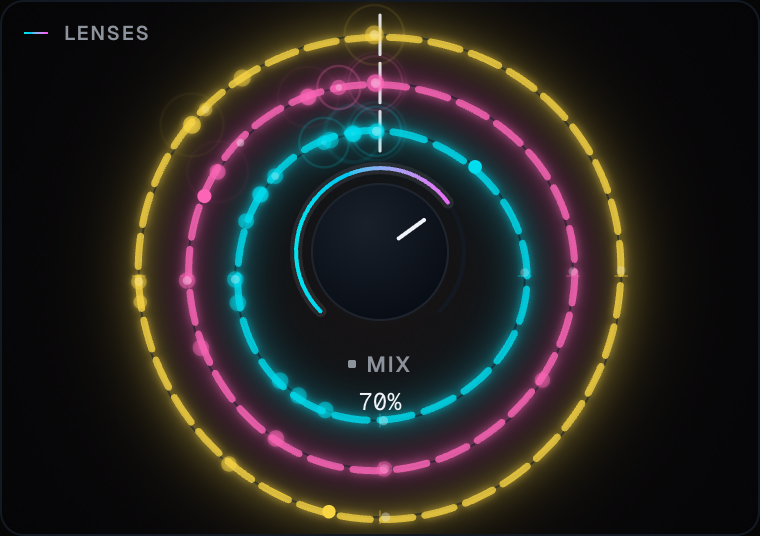
The rings are Micro, Meso, and Macro. They brighten when that layer is speaking: its own level, and its echoes when hits are coming through. The knob in the middle is the master Mix of all three layers against the dry signal. It starts around seventy percent wet.
This Mix is the one Wet lock protects. See the rail, below.
Echoes
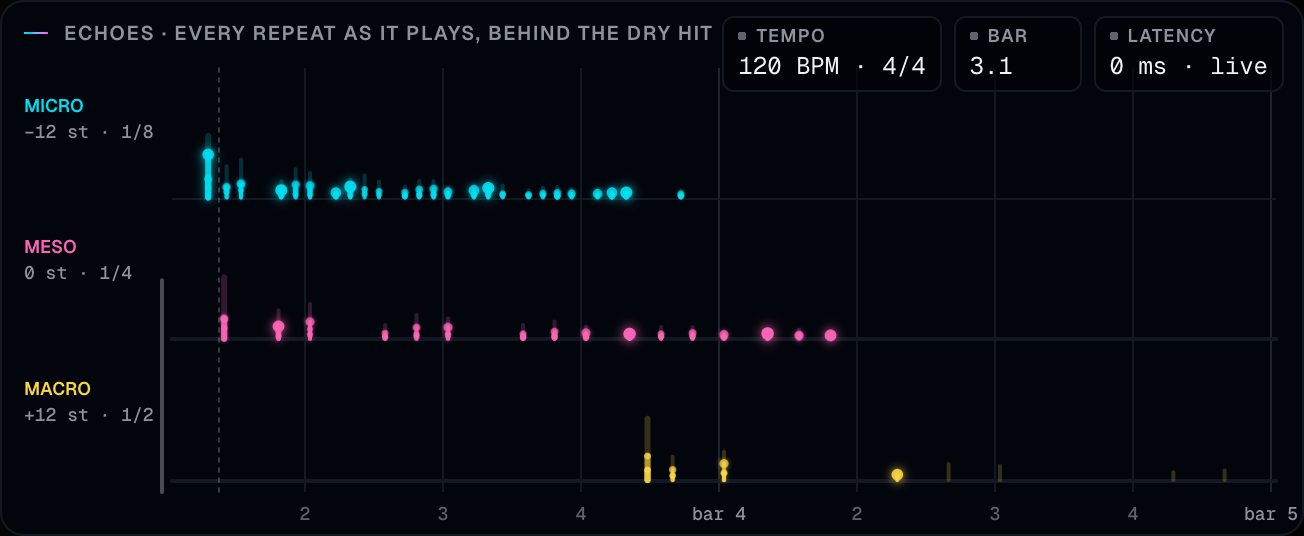
The title on the display is the instruction: every repeat as it plays, behind the dry hit.
- The grid is the host’s meter. Tempo and the bar position are printed on the display (
120 BPM · 4/4, and2.1while playing, orstopped). - Each lens draws its repeats in its own colour, labelled with that lens’s pitch.
- In Live timing the dry hit is immediate, and each layer blooms in after its own window. The echoes are drawn where you hear them, on the beat, behind that hit.
- In aligned timing the layers line up with the longest window, and the latency readout shows that delay instead of “live”.
Read Latency before you decide something is late. If it says 0 ms · live, the dry signal is on time and the layers are meant to bloom after it. If it shows a long time and does not say live, you are in aligned timing, and the host’s delay compensation should keep the track in line with the rest of the song. Leave delay compensation on.
Global
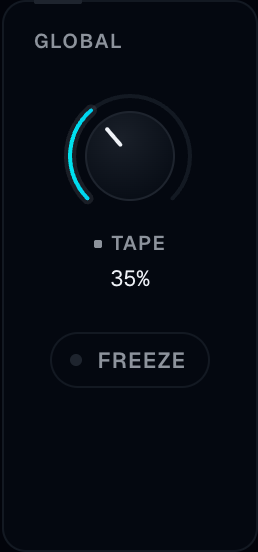
Tape
Tape adds wow, flutter, and soft saturation across every layer. It starts a little open, so the layers are not sterile. It does not sit on the dry path. At low settings it is a small pitch drift and a little warmth. At high settings the layers warble and soften. If the dry vocal must stay straight, this is safe to raise, because the dry signal is outside it. If you are fully wet, Tape is on the whole sound you hear.
Freeze
Freeze holds a cloud made from the last few seconds of audio — it looks back about four seconds and keeps the strongest moment — and sounds that cloud in every lens at that lens’s pitch. It eases in and eases out. While it is held, that lens’s repeats pause, so Feedback does not keep printing new echoes on top of the cloud.
Freeze is for a sustain you can play over, a transition, or a bed. It is not a looper you overdub into. The cloud is one captured moment until you turn Freeze off and on again.
Panic clears it, along with every tail. Panic is on the rail.
Advanced: quality, timing, transients
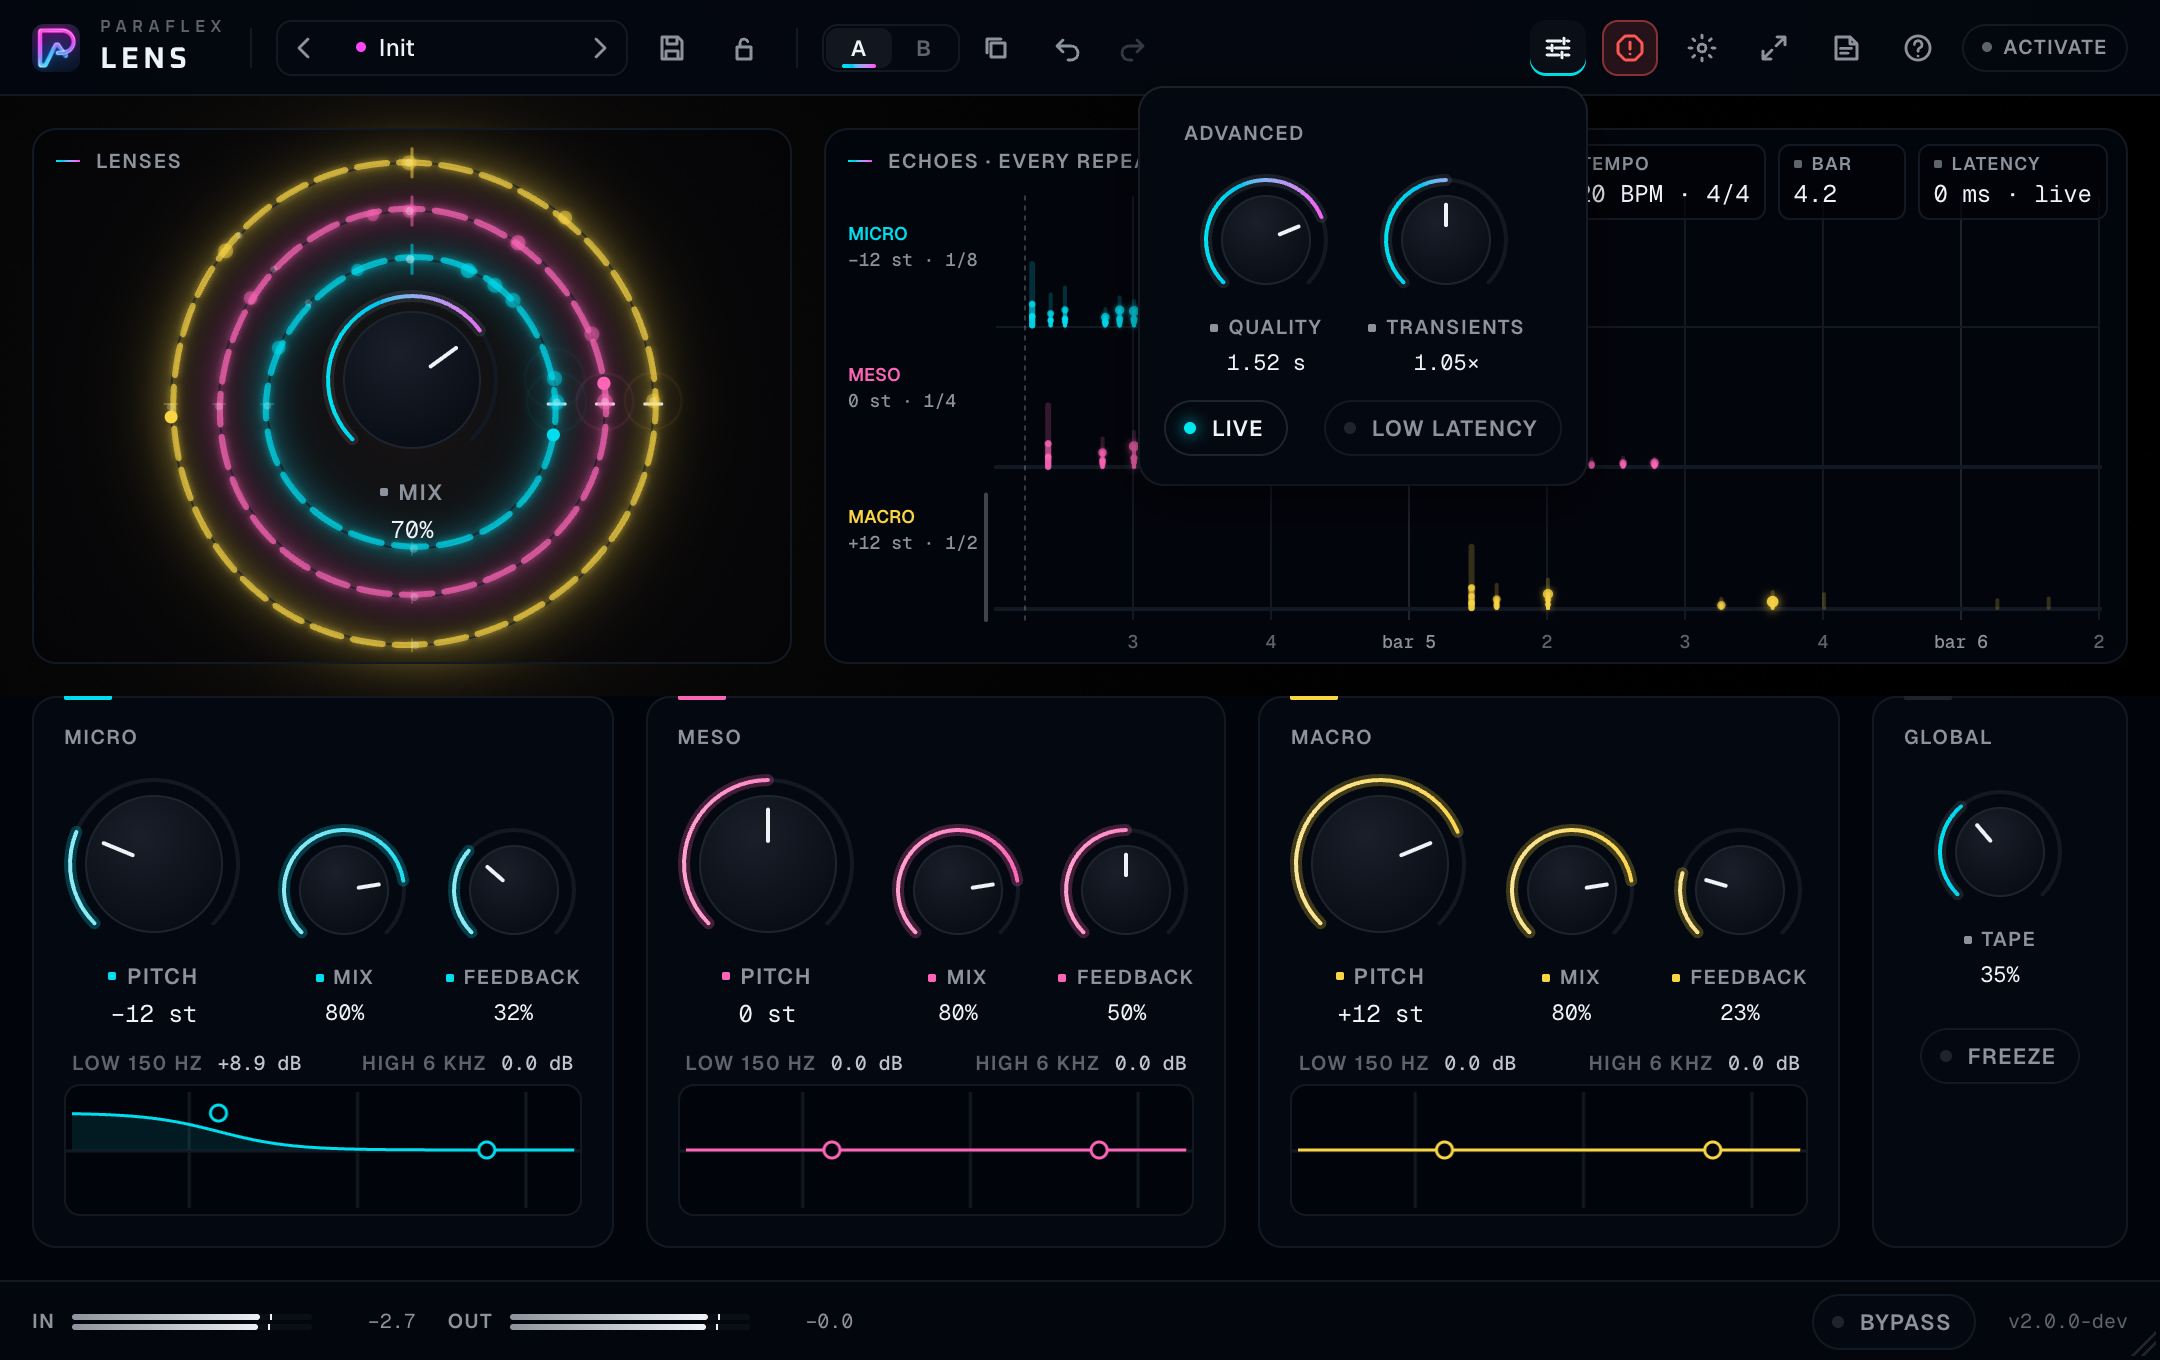
Open it from the sliders icon on the rail.
Live
Live is on for a new Lens.
- On. The plugin reports no latency. The dry signal plays at once. Each lens blooms in after its own listening window. Echoes stay on the beat. This is the right setting for recording and for playing.
- Off. Every path, including the dry signal, waits so it can line up with the longest window. The layers and the dry hit speak together. The host must compensate the latency, which it will if plugin delay compensation is on. Use this when you are mixing a printed part and you want the bloom exactly with the hit, or when you are matching a session that was built this way.
Sessions saved before Live existed open with Live off, so a mix you already committed to stays aligned. New instances start with Live on. If an old song feels late or early after an update, look at this pill before you move pitches.
Loading a preset does not change Live or Low latency. Those are how you are monitoring, not part of the sound. Wet lock is separate and only holds the master Mix.
Quality
Quality is the length of the listening window, from about a tenth of a second to about two seconds. Longer is smoother and slower to bloom. In Live timing, a longer window means the Macro layer arrives later. In aligned timing, a longer window means more latency for the whole plugin.
It starts long enough to be smooth (toward the two-second end of the travel, not at the extreme). Turn it down when you want the layers to speak sooner. Turn it up when you want a pad.
The window is rebuilt after a short settle, so a quick wiggle does not constantly restart the processing. Make the change, then listen a moment later. Do that between phrases if you are tracking.
Low latency
Low latency forces the shortest window and the lowest delay, and it disables the Quality knob. Use it for live input when even the Live bloom feels late. Turn it off when you go back to mixing and you want the Quality knob again.
Presets do not change this pill.
Transients
Transients is how readily hits are protected from smearing. The knob runs from a light touch (0.1×) to a firm one (2.0×). The middle, where it starts, is about normal (just over 1×).
Raise it when kicks and consonants turn into a wash. Lower it when you want those hits to dissolve into the layer. It is protection, not a transient designer on the dry signal. The dry path stays as it arrived, scaled by the dry side of Mix.
Panic

Panic resets every voice and tail. Echoes, Freeze, and filter rings stop on the next moment of audio. No knob moves. The pitches, the mixes, and Freeze’s on/off position stay where you left them; the sound those settings were holding is cleared. If Freeze is still on, a new cloud can form from what comes in next. Turn Freeze off if you wanted silence.
Panic is an action. It is not automated, and it is not stored in a preset.
Use it when a feedback tail or a freeze has outlived the section.
The Paraflex window
Rail

| Control | What it does |
|---|---|
| Preset arrows | Previous and next preset |
| Preset name | Opens the browser. A dot means you have edited the preset |
| Save | Name and category. Enter saves, Escape cancels |
| Wet lock | Keeps the master Mix where it is while you browse presets |
| A / B | Two setups. Switching is instant and can be undone |
| Copy | Copies the sounding side onto the other side |
| Undo / Redo | Moves you made in this window |
| Advanced | Quality, transients, Live, Low latency |
| Panic | Clears tails. Does not change settings |
| Aura | Full, Subtle, or Off. Glow only. The audio does not change |
| Size | S 80%, M 100%, L 125%, XL 150% |
| Guide | Opens this guide on paraflexaudio.com |
| Tips | Hover explanations. Off until you turn them on |
| License | Activation |
The first time you open Lens, a short walkthrough points at the three rings and at Panic, then at Guide and Tips. Skip it or step through it. It does not change the sound, and it does not come back on this computer.
#### Wet lock
Turn the padlock on before you audition presets if you have already set how wet the effect sits in the track. Lens locks the centre Mix only. The individual lens Mix knobs still come from the preset, because they are part of that preset’s recipe. Bypass stays put. Live and Low latency stay put.
#### Browser and factory presets
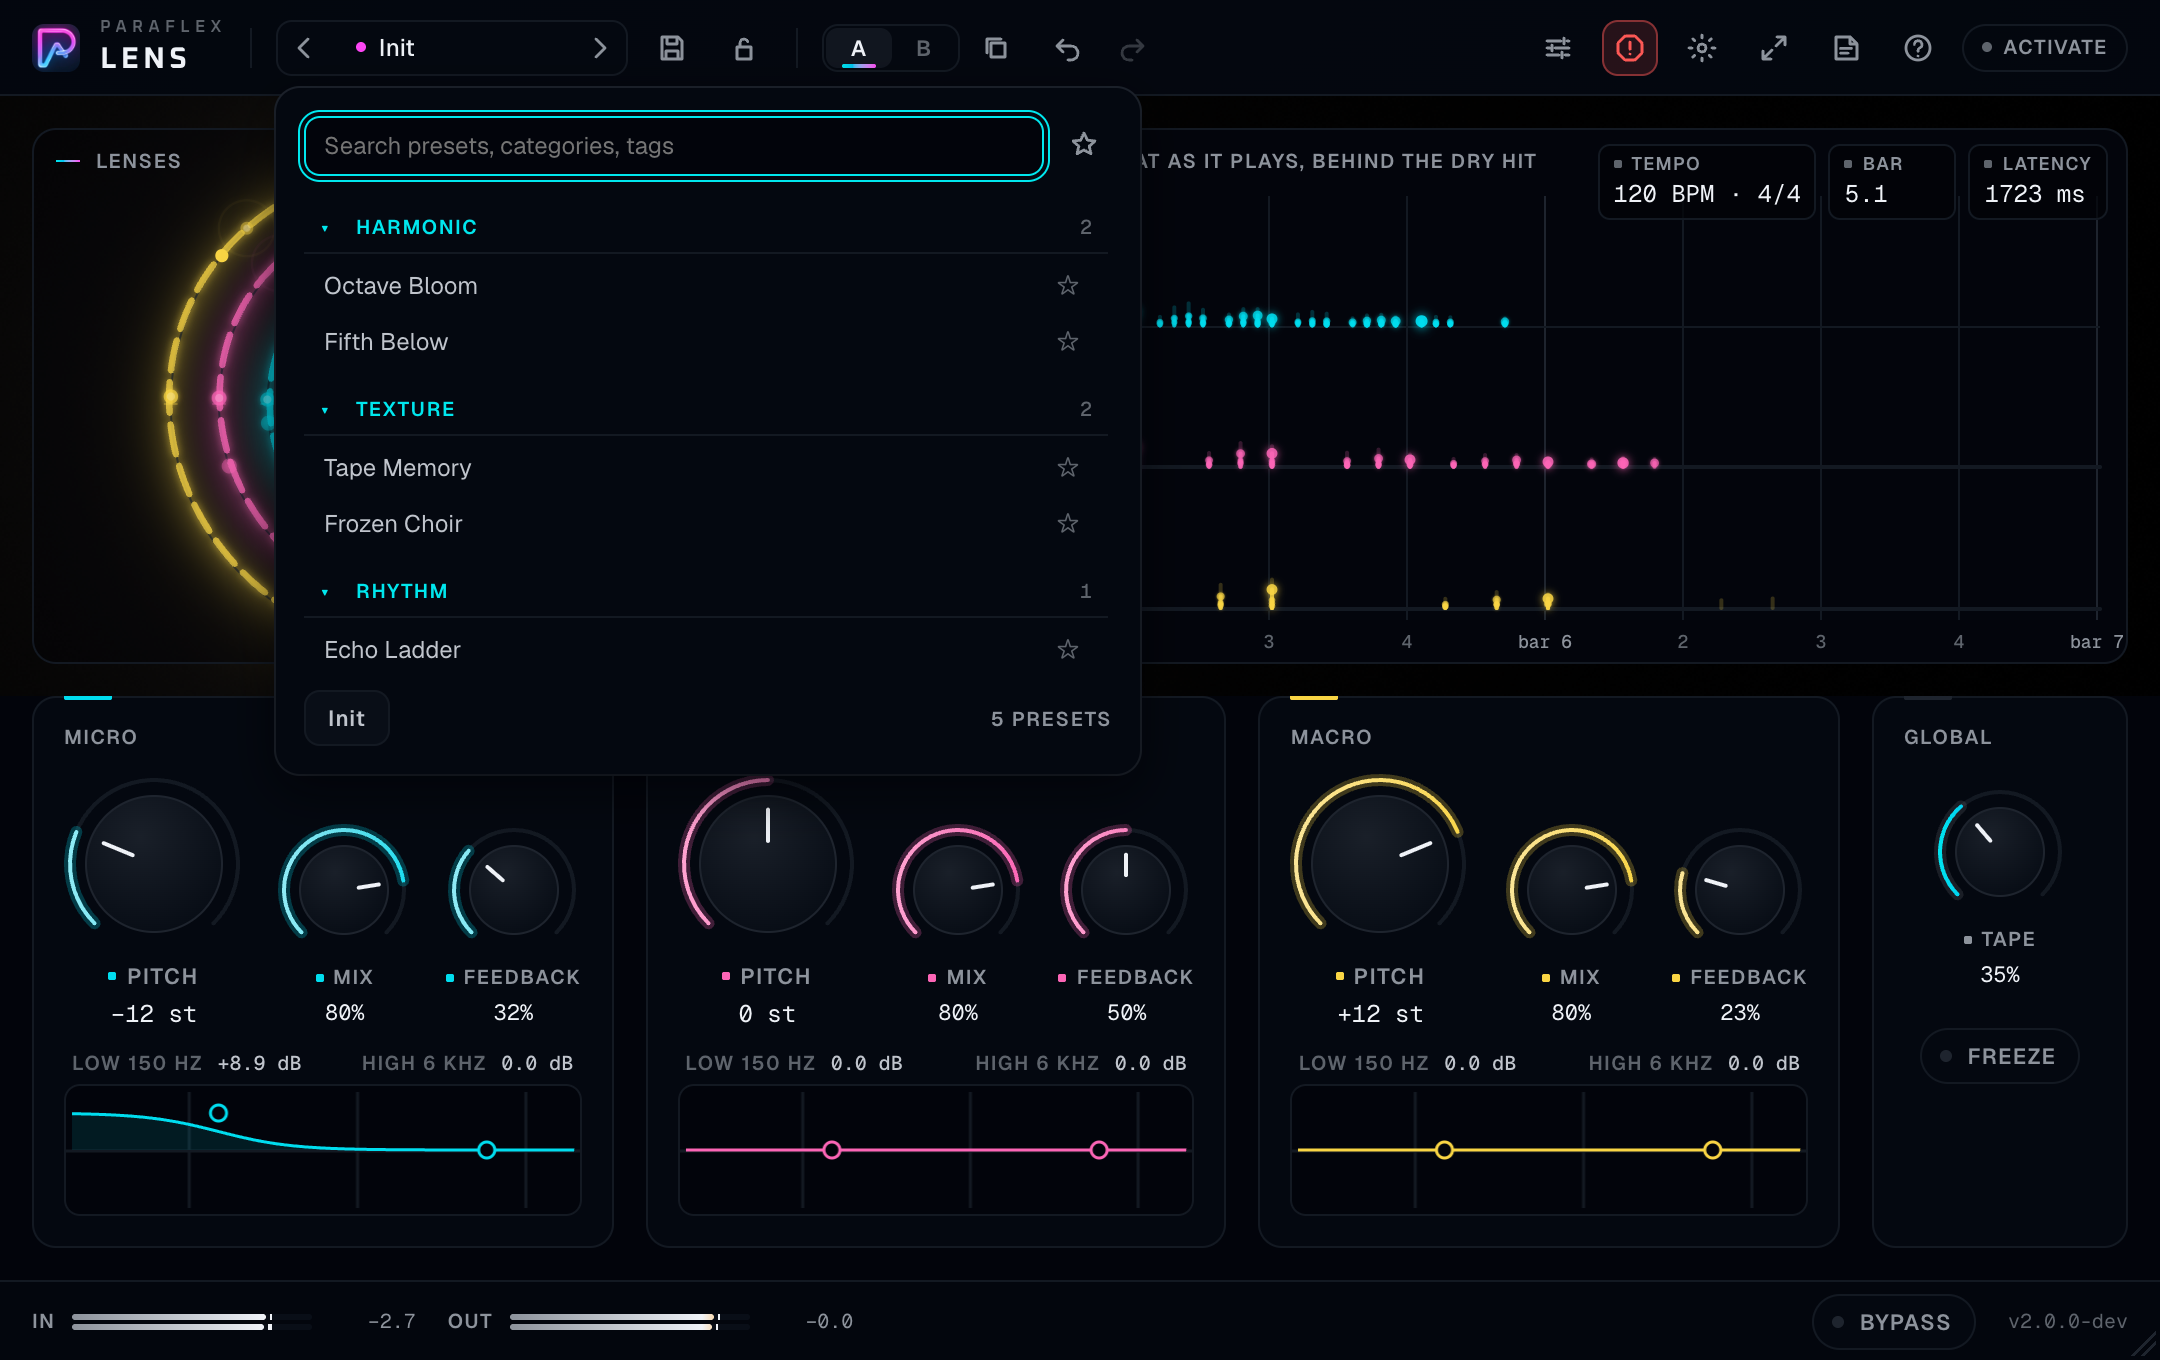
| Preset | Category | What to listen for |
|---|---|---|
| Octave Bloom | Harmonic | The opening octave stack, master Mix a little under the default |
| Fifth Below | Harmonic | Micro a fifth down, Meso and Macro turned off. A dark under-line |
| Tape Memory | Texture | Tape high, a little Micro feedback, Macro pulled back |
| Echo Ladder | Rhythm | The three pitches rearranged and all three feedbacks open, so the grid fills in |
| Frozen Choir | Texture | Freeze on, some Meso feedback ready for when you release Freeze, Mix high |
Search matches name, category, and tags (octaves, tape, freeze, and the rest). Star a favourite. Delete applies to user presets only. Init is a clean Lens: octave stack, feedback off, Live still however you had it.
User presets are stored for your account, in every project. The song itself stores the sounding setup, the preset name, whether it is modified, and whether wet lock is on.
A and B last while you work. The song keeps the setup you are hearing. Save two presets if you need both tomorrow. Undo in the window is for your gestures here. The host’s automation undo is the host’s.
Knobs
Drag up or right to increase. Shift or Ctrl drags finer. Scroll nudges, and Shift makes the scroll finer. Double-click, or Option-click / Alt-click, returns a knob to its default. Click the number to type. Enter confirms, Escape cancels. Focused knobs take arrow keys, Page Up and Page Down, Home and End, and Delete or Backspace to reset.
The value card waits briefly so a sweep across the bench stays quiet, then stays quick between neighbouring knobs. While you drag, it follows.
Footer

- In and Out are peak meters in dBFS. Click a number to clear the peak and the clip hold.
- Bypass is latency-matched. The dry signal stays time-aligned with the processed signal, so you can compare without a skip. Presets do not change Bypass.
- There is no separate Delta on Lens. To hear only the layers, turn the centre Mix fully wet. Remember that Live timing still lets those layers bloom after the hit, so “only the effect” is not the same thing as “the effect on the same sample as the dry hit” unless Live is off.
If your system asks for reduced motion, the window calms its animation. The audio is the same. Aura Off is the control you have inside the plugin when you want the displays quiet.
Signal path, in listening order
- The input is metered.
- In aligned timing, everything waits for the longest window. In Live timing, the dry signal does not wait.
- Micro, Meso, and Macro each listen at their own scale, pitch the result, and shape it with that lens’s shelves.
- Feedback prints tempo-locked repeats for that lens, unless Freeze is holding the cloud.
- Tape warms and drifts the layers.
- Transient protection holds hits together according to the Advanced knob.
- Each lens Mix sets that layer. The centre Mix blends all of the layers against the dry signal.
- The output is metered.
Panic silences tails without moving any of those controls.
Working habits
Set the centre Mix in the track, then turn wet lock on, then browse. Presets are recipes. Your wetness is a mix decision.
Mute two lenses before you decide the third is wrong. Pull that lens’s Mix down. Macro is often the one making a vocal cloudy, because its window is the longest. Micro is often the one making a drum bus fluffy, because it is an octave down and grain-sized.
Use Feedback like a send, not like a default. Echo Ladder is a demonstration that all three can run. On a vocal, one lens with a little feedback is usually the part. The other two can stay pitched and almost dry of repeats.
Match the pitch stack to the harmony. −12 / 0 / +12 is an octave stack and it fits most tonal music. A fifth (seven semitones) is the next most useful interval. Dissonant offsets are a sound-design choice. Write them down in the preset name.
Shelves are how you keep the effect out of the way. Low shelf down on Micro stops an octave-down layer from piling up with the bass. High shelf down on Macro stops the bloom from competing with a vocal’s air, or the reverse: high shelf up on Macro only, when the dry vocal is already dark.
Live for tracking. Aligned when the picture must be sample-honest. Do not track a vocal with a two-second aligned latency. Do not judge a printed mix’s groove in Live timing and then bounce with Live off without listening again. The echo display is there so you can see which of those you are in.
Leave delay compensation on. Lens tells the host the truth about latency. If the host is not compensating, aligned mode will sound late, and that is the host setting.
Freeze with intention. Hit it on a chord you like, play through the cloud, release it before the next section. Panic if the cloud was the wrong chord.
A/B the last move. Copy to the other side, change one thing (often Feedback or one pitch), switch back. If the improvement is not obvious, keep the earlier side.
Watch Out when Mix is high and Feedback is high. Repeats add level. If the meter pins, lower the centre Mix or the loud lens, not only the track fader, so the internal balance stays where you set it.
One Lens is usually enough on a source. A second Lens later on the bus hears the first Lens’s bloom and will bloom that too. If you want both, the second one should be quieter and simpler.
Commit the timing mode with the mix. Live and Low latency are not inside the preset. If the song depends on aligned timing, that pill has to be off on the instance in the session. The session does store it, because it is a real control. Presets simply do not overwrite it when you browse.
Recipes
Vocal bloom
Live on. Micro Mix down. Meso at unison, Mix moderate, Feedback just open so you get one or two quarter-note shadows. Macro at +12 or +7, Mix lower than Meso, high shelf up a little, low shelf down. Centre Mix until the dry vocal is clearly in front. Wet lock on. Tape low.
Drum space
Live on if the drums are being played, aligned if they are printed and you want the layers on the hits. Micro at −12 with the low shelf down and Transients up, so the kick does not smear. Meso feedback on eighths by using the Micro feedback instead if you want hats; for a snare tail use Meso feedback lightly. Macro Mix low. Centre Mix low. This should feel like room, not like a second kit.
Octave guitar
Fifth Below as a start, then bring Meso back in at unison at a low Mix so the dry-and-layer guitar has a quiet centre. Or keep Meso off and ride Micro’s pitch between −12 and −7. Tape up for sag. Feedback off if the part is already busy.
Transition cloud
Play into a sustained chord. Click Freeze. Mute or bypass the source if you want only the cloud. Ride centre Mix. At the downbeat of the next section, Freeze off, or Panic if the release is too long. Aligned timing makes the cloud’s entrance easier to place against the grid. Live timing makes the cloud arrive after the window, which can be the swell you wanted. Look at the echo display and decide.
Fully wet texture
Centre Mix at full, so the dry path is gone. Live off if you need the texture on the grid with the original timing. Quality long. Macro dominant. Feedback moderate. This is a sound-design bus, not a vocal insert. Name the preset that way.
Common questions
The effect feels late and the readout says live. That is the bloom. Each lens has to hear its window before it can speak. Shorten Quality, or turn Low latency on, or turn that lens’s Mix down. The dry signal itself is not late in Live mode.
The whole track is late against the song. Live is off, and the host is not compensating plugin delay. Turn delay compensation on, or turn Live on.
An old session sounds earlier or later than I remember. Look at Live. Older sessions stay in aligned timing on purpose. New instances start live. Set the pill to the behaviour that mix was built with.
Presets do not change my Mix. Wet lock is on. That is what it is for. Turn it off if you want the preset’s own wetness.
Presets do not change Live or Low latency. They are left alone on purpose, so browsing sounds does not kick you out of the timing you are tracking with.
Feedback is off and I still hear a wash. You are hearing the layers themselves, pitched and windowed, not the repeats. Lower the lens Mix knobs or the centre Mix. Macro is the usual source.
Freeze is on and Feedback does nothing. Repeats pause while the cloud is held. Turn Freeze off to hear the repeats again.
Panic did not turn Freeze off. It cleared the cloud. The pill stays on, so a new cloud can build. Click the pill if you want Freeze off.
The echoes are not on the click. The host tempo or the meter is not what you think, or the transport is stopped and you are hearing free audio. Read Tempo and Bar on the echo display. Lens follows the host. It does not have its own tempo.
I cannot type a pitch between semitones. Pitch is in semitone steps, from −24 to +24. Cents live in Tape’s drift, not on the pitch knobs.
Quality will not move. Low latency is on. Turn it off.
The window changed a moment after I moved Quality. The listening window rebuilds after a short settle. Wait a beat and judge the sound then.
Bypass clicks or shifts the timing. It should not. Bypass is aligned and it eases. If you hear a shift, check that you are not also changing Live in the same moment. Those are different delays.
CPU is high. Shorten Quality, turn Low latency on, or freeze less often on many instances. Three long windows on every track of a dense session will cost more than one Lens on a bus.
The window is a plain list of controls. On Windows, run the installer again and restart the host. On macOS, update the system.
Pro Tools does not list it. You need the AAX component from an installer that includes it, then a rescan.
Activation failed. The prefix is PFXL. One machine at a time. The status line on the sheet is the specific reason.
If something seems wrong
| What you notice | What to check |
|---|---|
| Silence | The source is silent, Mix is down, or Bypass is on |
| Only dry | Centre Mix at zero, or all three lens Mix knobs at zero |
| Smear on hits | Transients up, Micro Mix down, Quality shorter |
| Mud in the bass | Low shelf down on Micro, or Micro Mix down |
| Harsh bloom | High shelf down on Macro, Tape down, centre Mix down |
| Repeats runaway | Feedback down. Panic to clear what is already ringing |
| Late against the arrangement | Latency readout, Live pill, host delay compensation |
| Two Lenses in the list | Duplicate install. See Install |
| Session opens “different” | Live, Low latency, and the centre Mix. Then the pitches |
Words used in this window
| Word | Meaning |
|---|---|
| Micro / Meso / Macro | The three listening scales, short to long |
| Mix (centre) | All three layers against the dry signal |
| Mix (on a lens) | That one layer’s level |
| Feedback | Tempo-locked repeats of that layer |
| Live | Dry signal immediate, layers bloom in, no reported latency |
| Aligned | Live off. Everything waits for the longest window |
| Quality | How long a window Lens uses to listen |
| Low latency | Shortest window, for tracking |
| Transients | How firmly hits are kept from smearing |
| Freeze | A held cloud of the recent audio, at each lens’s pitch |
| Tape | Wow, flutter, and soft saturation on the layers |
| Panic | Clear every tail now |
| Wet lock | Keep the centre Mix while changing presets |
| Bloom | The layer arriving after its window in Live timing |